Table of Contents
- Introduction
- Delivery Steps
- Uploading Video Files
- Managing Metadata
- Adding Image Files
- Adding Closed Captions
- Creating Ad Breaks
- Creating Playlists
- Creating Channels
- QC Process and Ingest
Introductions
All content delivered to dotstudioPRO for Aggregation must be supplied through the dotstudioPRO dashboard. If you or your company do not have a dashboard, or you require credentials to deliver on behalf of a client, please contact your dotstudioPRO Client Representative.
This article will outline the major steps in creating content that is ready for QC and platform syndication. Information about our technical specification can be found in the Aggregation Deliverables.
Delivery Steps
| Video Level | Channel/Series Level |
|---|---|
|
|
Uploading Video Files
Videos can be uploaded to the client dashboard using the video tab. A maximum of 50 files can be uploaded at a time. For deliveries of very large content libraries, contact your Client Representative to arrange alternative content ingestion. Please familiarize yourself with our technical specifications, prior to delivery.
How To Upload a Video
- Have your dashboard open to the “Videos” tab and click the “Add Video” button.
- The “Add Video” dialogue will appear as a pop-up. On the left are upload options. Video files can be added from your computer, a connected Amazon S3 bucket, Rackspace, among others.
- Once video files have been added, their names will be displayed in the “Add Video” dialogue alongside progress bars. Do not close the dialogue or window while uploads are in progress.
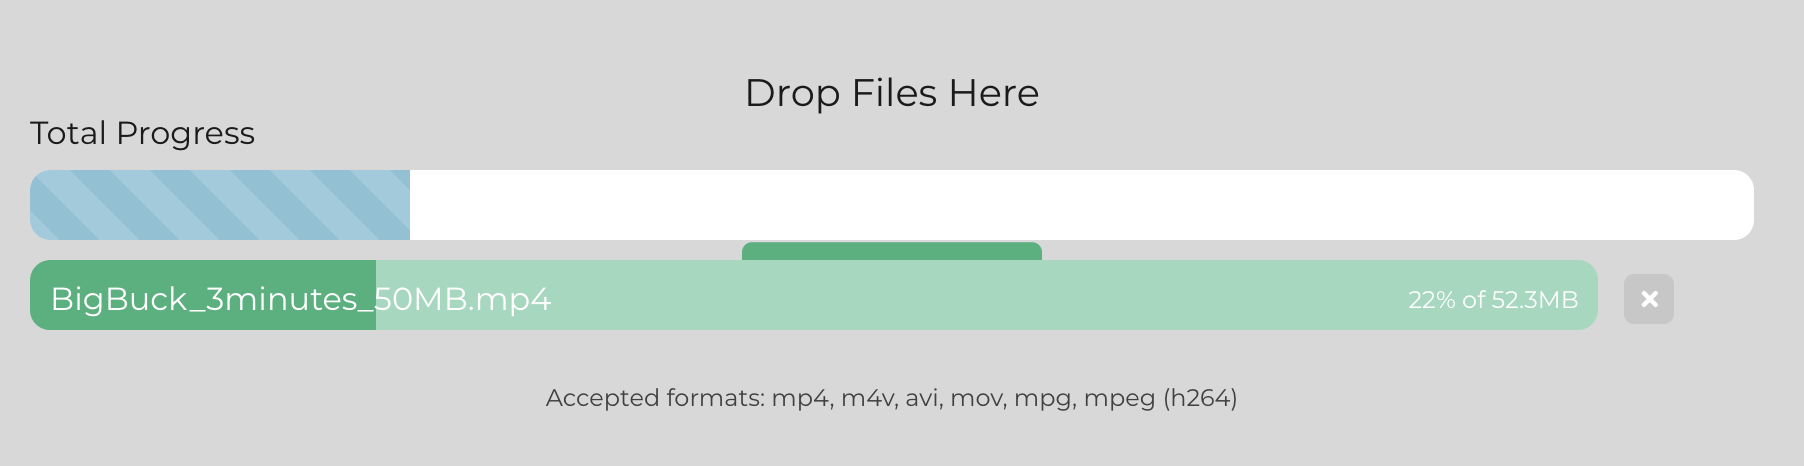
- Once all files have finished uploading, you may close the dialogue and refresh the page.
- After reloading, your video files will appear on your dashboard as video objects. New progress bars beside your videos indicate that the dotstudioPRO system is transcoding your files into the various output formats required by our partner platforms. Until this transcode process has finished the videos cannot be used or edited. Once completed, the progress bar will disappear and a thumbnail image should populate.


Managing Metadata
Once a video file has been fully uploaded and transcoded it is ready for metadata! Different platforms have different metadata requirements, so be sure to reference the Aggregation Deliverables for your delivery.
How To Edit the Metadata of a Video
- From the “Videos” tab click the green “Edit” button beside the video you would like to manage metadata for, and select “Details” from the dropdown menu. A metadata dialogue will open.
- The metadata dialogue box contains empty fields for your information. You will need to complete all mandatory fields. Failure to do so can result in failed QC or rejection at the platform level.
- Once you have completed the mandatory fields, click the green “Save Details” button at the bottom of the dialogue. After a moment, a prompt should appear in the top left corner of your window, to let you know the changes have been saved.
| Required Metadata for All Videos | Additional Metadata for Episodic Content |
|---|---|
|
|
Adding Image Files
Video level image files are required for all deliveries. File specifications can be found in the Aggregation Deliverables.
Each video should include:
- 1x Poster Image
- 1x Thumbnail Image
- Wallpaper images are optional
How to Add Poster Images
- From the metadata dialogue box, click the “Image Assets” tab on the left side menu OR from the “Videos” tab click the green “Edit” button beside the video you are adding images to, and select “Image Assets” from the dropdown menu.
- Click the box labeled “click here to upload poster” and select your file.
- Click the green “Save Details” button at the bottom of the dialogue.
How to Add Thumbnail Images
- From the metadata dialogue box, click the “Thumbnails” tab on the left side menu OR from the “Videos” tab click the green “Edit” button beside the video you are adding images to, and select “Thumbnails” from the dropdown menu.
- You will be presented with six randomly generated stills from the video file. There are also buttons for uploading specific images to be used as video thumbnails.
IMPORTANT NOTE:
For standalone titles thumbnail images must include the title art for the movie and no other text.
Adding Closed Captions
Closed captions are required for all deliveries. File specifications can be found in the Aggregation Deliverables. One VTT and one SRT are required for all deliveries.
How to Upload Closed Captions
- From the metadata dialogue box, click the “Captions” tab on the left side menu OR from the “Videos” tab click the green “Edit” button beside the video you are adding images to, and select “Captions” from the dropdown menu.
- Click on the dropdown menu labeled “Language” and select the language of the file you intend to upload.
- Click the green “Select Files” button and select the file you would like to upload. Files must be uploaded one at a time.
- Repeat this process for both your SRT and VTT files.
- Once caption files have been uploaded you can spotcheck them using the “Embed” dialogue (left side menu), and clicking the “Preview” button. Your video will open in a new tab where (if a VTT has been uploaded) you can enable closed captions for playback.
Note:
The system will not accept multiple caption files for the same video in the same language and format. i.e. you cannot upload two English SRT files, but you CAN upload one English SRT and one English VTT.
Creating Ad Breaks
Ad breaks are required for all videos. Please review the Aggregation Deliverables for our current ad break policy. Mid-roll markers are required for all videos longer than 12 minutes.
How to Create Mid-Roll Markers
- From the metadata dialogue box, click the “Advertising” tab on the left side menu OR from the “Videos” tab click the green “Edit” button beside the video you are adding images to, and select “Advertising” from the dropdown menu.
- Scroll down below the video player to the section labeled “Mid-Roll Ads”, and click the “Enabled” switch so it moves to the right and turns green.

- The “# of ads” field may be left blank, as it will default to a value of one whenever you indicate an ad break.
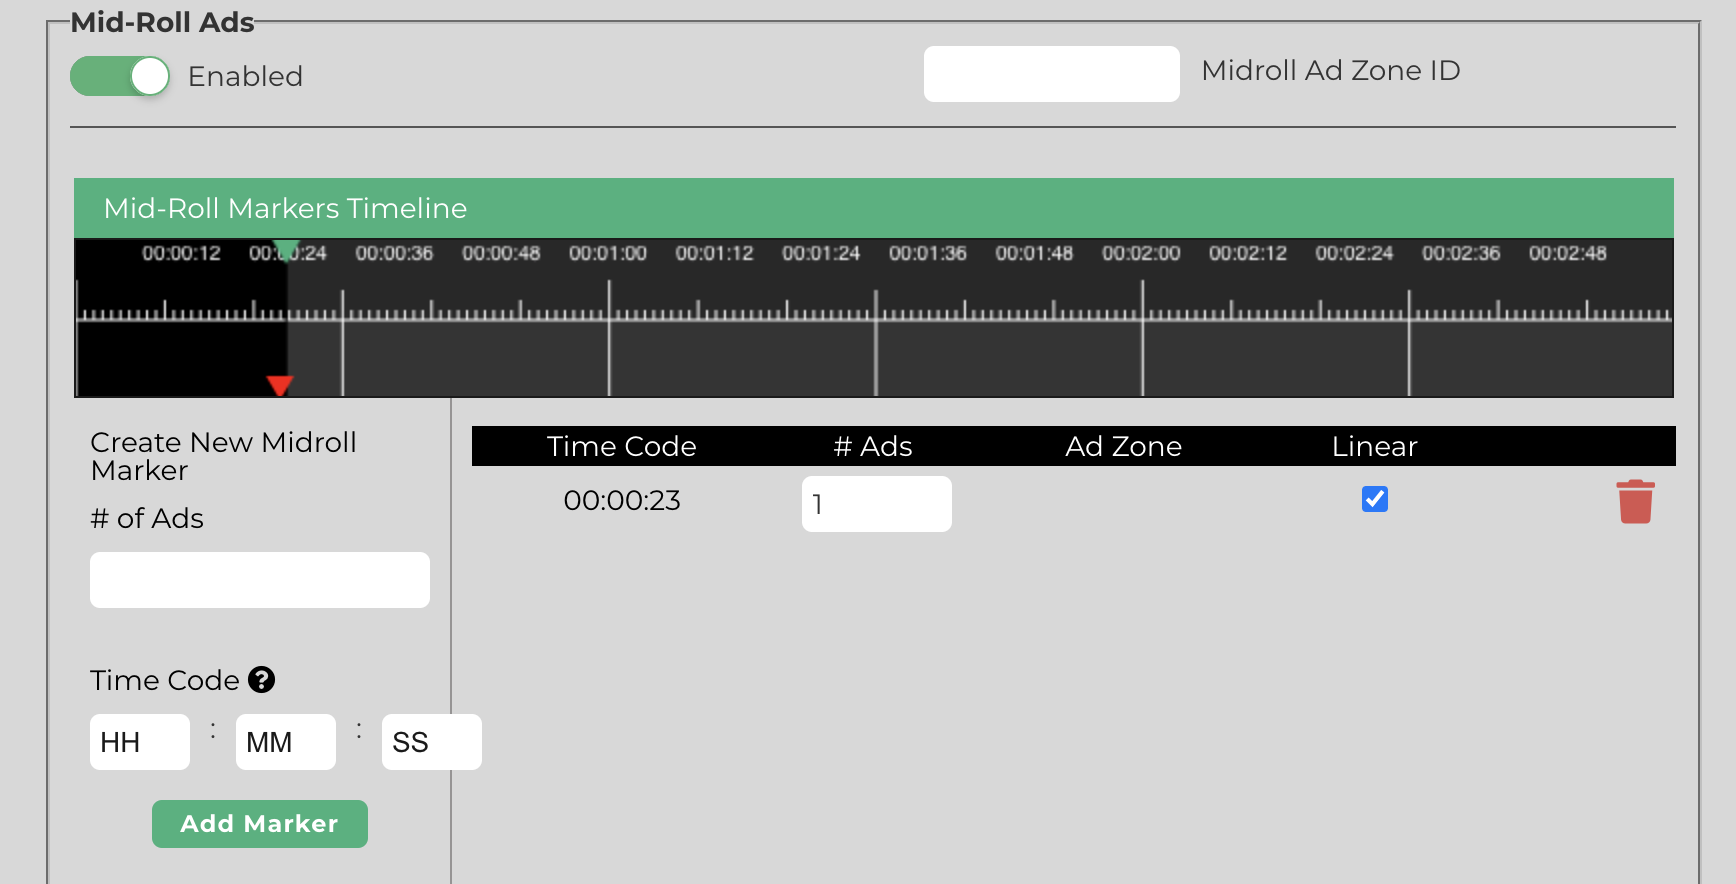
- Using either the video player or “Time Code” fields select the point where you wish to insert an ad break, then click the “Add Marker” button. Once you do so, the ad break time will be added to the list on the right, and a red marker should appear in the “Mid-Roll Markers Timeline”.
- Once all ad markers have been created, click the green “Save Details” button on the bottom right.
IMPORTANT NOTE:
It is imperative to follow the dotstudioPRO ad break policies when creating ad breaks. Failure to do so can result in rejected content, and wasted time. Our full advertising policy can be found in the Aggregation Deliverables.
Mid-Roll Timing Policies
Ad breaks must occur at natural scene breaks. Natural points include fades to black, or transitions between shots or scenes. Cue points should not occur during lines of dialogue or in the middle of scenes.
Movies & Standalone Videos (12 Minutes +)
Earliest: No earlier than 10 minutes into playback of video.
Frequency: Minimum of 10 minutes between each adbreak.
Latest: 10 minutes or more before end credits.
Episodic Videos (12 Minutes +)
First Adbreak: No earlier than 5 minutes into playback of video.
Frequency: Minimum of 7 minutes between each adbreak.
Last Adbreak: 5 minutes or more before end credits.
Shortform Content (Less than 12 Minutes)
No mid-rolls required. Pre-roll ads will be added automatically by our systems.
Creating Playlists
Playlists are how platforms are able to organize serialized content. They are only required for episodic content and should be used to represent a “season” of a series. Generally speaking you should create playlists after all metadata for the individual videos has been entered.
How to Create a Playlist
- From the “Videos” tab click the “Create Playlist” button near the top of the page, then select “Manual Playlist” from the dropdown menu.
- At the bottom of the screen the “New Playlist Menu” will appear. Name your playlist.
- Recommended Playlist Syntax: “[Series Name] – Season [season number]”
- Example Playlist Name: Kim’s Convenience: Season 1
- In the top half of your screen drag and drop the relevant videos into the playlist.
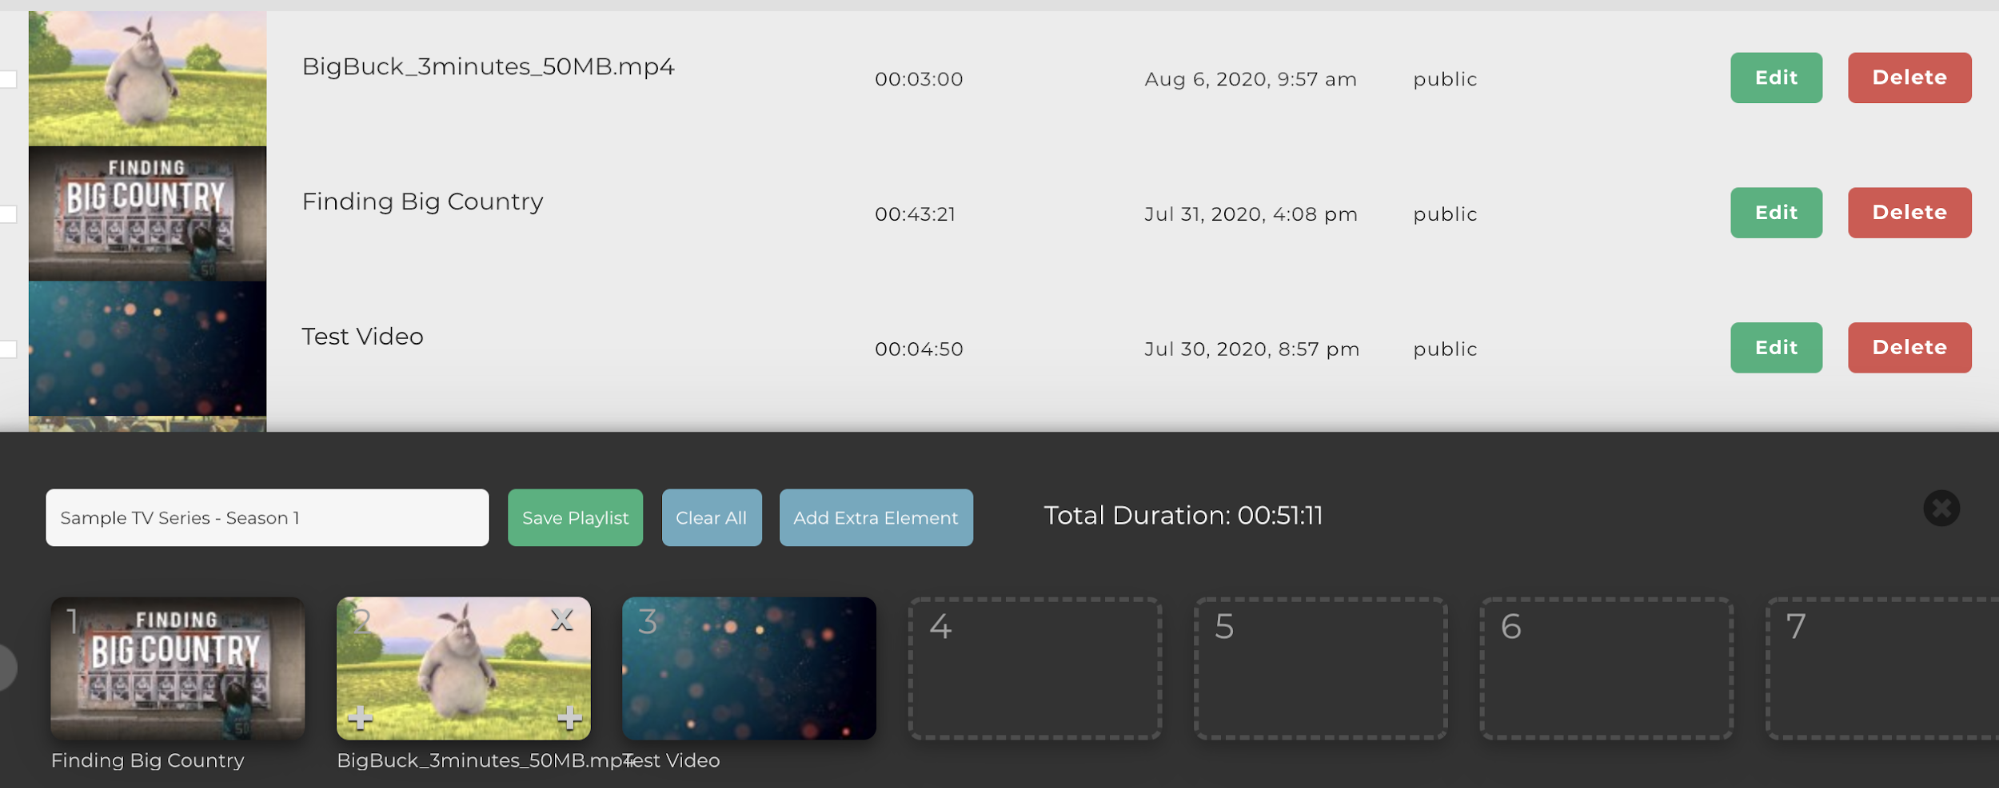
- Once videos have been added, you can resequence the playlist by clicking videos in the playlist menu and dragging them into a new order.
- When the playlist has been organized sequentially, click the green “Save Playlist” button.
Creating Channels
Channel creation is the last step in delivery. Channels are created and managed in the “Channels Tab” of the dotstudioPRO dashboard. They represent the splash page/interaction point of your content on the various platforms.
Channel Types
- Single Channels
(required for each movie and each season of a TV series) - Parent Channels
(required for each TV series)
| Single Channel | Parent Channel |
|---|---|
|
|
How to Create a Single Channel
- From the “Channels” tab click the “Add Channel” button near the top of the page.
- You will be prompted to name the channel:
- Movies: use the name of the movie
Example Movie Channel Name: Star Wars: The Phantom Menace
- TV Seasons: Use this syntax “[Series Name] Season [season number]”
Example TV Season Name: Kim’s Convenience Season 1
- Movies: use the name of the movie
- A dialogue will open which asks what kind of channel you would like to create. Select Single channel.
- A dialogue box for channel metadata will open. You will need to complete all mandatory fields. Failure to do so can result in failed QC or rejection at the platform level.
- Upload your poster and 16×9 key art. Logos are not required.
- Once metadata and artwork have been entered/uploaded click the “Continue to Contents” button at the bottom right.
- In the next dialogue search for the playlist (tv season) or video (movie) to associate with this channel and click on it so it becomes highlighted.
- Click the “Save Changes and Publish” button.
How to Create a Parent Channel
- From the “Channels” tab click the “Add Channel” button near the top of the page.
- You will be prompted to name the channel:
- TV Series: use the name of the TV Series
Example TV Series Channel Name: Kim’s Convenience
- TV Series: use the name of the TV Series
- A dialogue will open which asks what kind of channel you would like to create. Select Single channel.
- A dialogue box for channel metadata will open. You will need to complete all mandatory fields. Failure to do so can result in failed QC or rejection at the platform level.
- Upload your poster and 16×9 key art. Logos are not required.
- Once metadata and artwork have been entered/uploaded click the “Continue to Contents” button at the bottom right.
- In the next dialogue search for the channels which represent each season in your tv series channels. You can add them by dragging from the left table into the right table.
- Click the “Save Changes and Publish” button.
|
Required Metadata for All Channels |
|
|---|---|
|
|
NOTE:
When creating channels, please leave the “Categories” field blank, unless instructed otherwise by a dotstudioPRO Client Representative.
QC Process and Ingest
Once all videos have been updated with complete metadata, artwork, and captions, and have been correctly nested within playlists and channels, contact your dotstudioPRO client representative. A technician will review your submission and contact you if any changes are required.
Some Common QC Issues Include:
- Superfluous content at head or tail of the video file (bars & tone/textless elements)
- Too much black at head or tail of the video file
- Commercial blacks have not been closed
- Closed captions sync (out of sync/drift/etc.)
- Short description is too long (max. 200 characters)
- Content contains social media tags/calls to action/URL’s
If your content has been flagged for QC issues, a representative from our tech team will get in touch to walk you through asset redelivery.
Updated